The gap between a pal with empty passive slots and one with four attack passives is bigger than any level difference, any gear upgrade, and most partner skills: it is close to double damage on every hit. Palworld 1.0 gives you three separate systems for guaranteeing that stack instead of gambling on wild spawns, and you can start working on all three from level 19.
Moxsy walked through his full perfect-pal pipeline in the video below, and it is worth a watch for the live breeding session alone. This guide takes the same strategy, checks every number we can against the 1.0 game data that powers our Palpedia and calculators, and lays it out as a reference you can come back to between eggs.
The Four Attack Passives Worth Stacking#
Every pal rolls zero to four passive skills. For a fighting pal, these are the four you are hunting in 1.0:
| Passive | Effect | Drawback | How you get it |
|---|---|---|---|
| Ferocious | +20% attack | None | Wild rolls, breeding |
| Musclehead | +30% attack | -50% work speed | Wild rolls, breeding |
| Demon God | +30% attack | None | Rainbow roll during breeding |
| Serenity | +10% attack, 30% faster skill cooldowns | None | Breeding, arena implant |
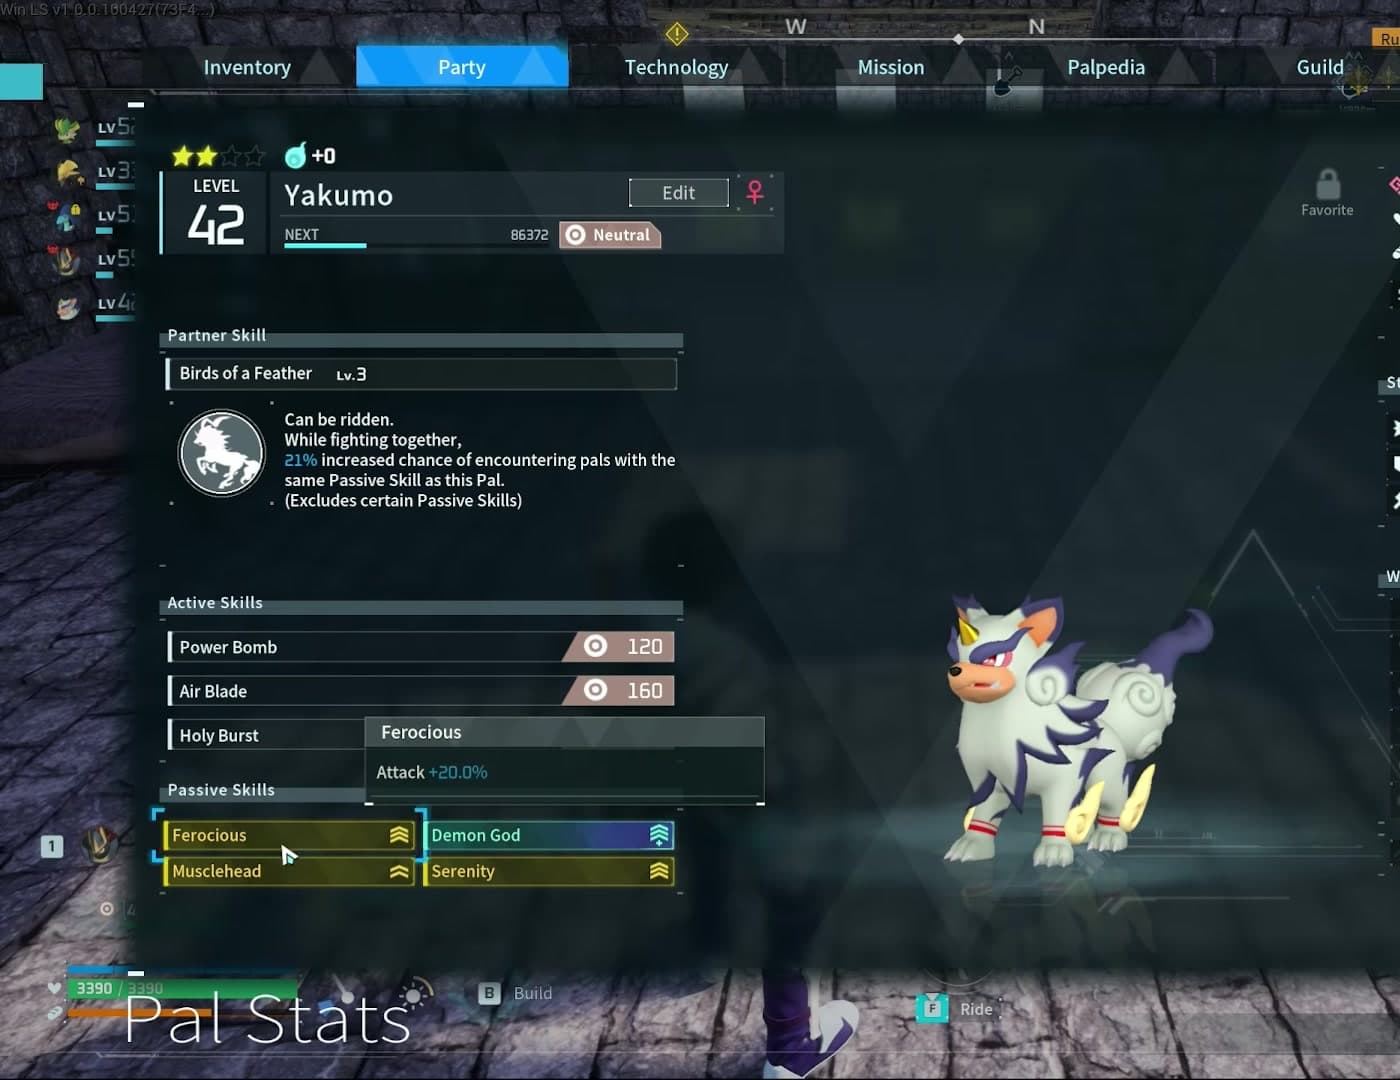
Stack all four and you are sitting at roughly +90% attack, with Serenity also cycling your biggest hits almost a third faster. Musclehead's work speed penalty is irrelevant on a combat pal that never touches your base.

Rainbow Passives: How Demon God Actually Rolls#
Demon God belongs to a special pool the community calls rainbow passives, and the game files call mutations. They roll stronger than regular passives and land on top of normal inheritance rather than competing with it.
The 1.0 numbers, straight from the data files behind our Mutation and Cake Lab:
- Every bred egg has a 1% base chance to mutate.
- Baking a Deluxe Vegetable Cake raises that egg to 3%.
- The Vegetable Cake does not change the odds but produces two eggs per batch, doubling your rolls per breeding cycle.
A 1 in 100 roll sounds brutal, but you are not fishing for it on purpose so much as collecting it as a byproduct: run enough eggs through the breeding funnel below and a Demon God or Diamond Body will eventually land on a keeper. When Moxsy's did, it rolled alongside the passives he was already stacking, which is exactly why the funnel matters.
Lock the Stack In With Breeding#
Wild pals roll passives randomly. Bred pals inherit from their parents, and the 1.0 inheritance odds are fixed: a child inherits 1 parent passive 40% of the time, 2 at 30%, 3 at 20%, and 4 at 10%.
That means the odds of hitting your full target set per egg depend on keeping the parent pool clean. If the passives across both parents are exactly the ones you want and nothing else:
| Target set | Chance per egg |
|---|---|
| 1 passive | Guaranteed |
| 2 passives | 60% |
| 3 passives | 30% |
| 4 passives | 10% |
| 4 passives + Special Cake | Guaranteed |
The Special Cake is the quiet star of 1.0 breeding: it forces the child's inheritance count to four, so two clean parents produce a perfect copy every single time. Until you can bake it, the play is volume: a stack of  Cake, a ranch producing eggs, milk, and honey, and the two-eggs-per-batch Vegetable Cake.
The workflow Moxsy demonstrates is the classic funnel:
- Catch parents that each carry at least one target passive
- Breed and keep any child that combines two targets
- Pair matching children to breed negatives out and stack targets up
- Use a Pal Reverser at the surgery table if your two keepers roll the same gender
- Finish with two clean parents and copy them at will
Plan your parent pairs in the Breeding Calculator, and model your exact odds and expected egg counts in the Mutation and Cake Lab before you commit an evening to it.

Guarantee 1: Yakumo Copies Your Passives Onto Wild Pals#
 Yakumo has the most economy-warping partner skill in 1.0. Birds of a Feather gives every capture you make a chance to roll with the same passive skills as your Yakumo, and the chance scales with the partner skill's rank:
| Partner rank | Copy chance per capture |
|---|---|
| 1 | 15% |
| 2 | 18% |
| 3 | 21% |
| 4 | 24% |
| 5 | 30% |
Build one Yakumo with your four attack passives and up to 30% of everything you catch afterward comes pre-rolled. Two details make it even better: Yakumo only needs to be your active pal at the moment of capture, not during the fight, and the skill excludes only a handful of special passives.
Wild Yakumo run around level 54 in the far north at (-624, 231) per Moxsy's route, which is why breeding one early is the move. Our 1.0 data lists 237 parent combinations that produce Yakumo, and the earliest practical one is  Foxparks plus
  Vaelet: Foxparks is all over the starting plateau, and Vaelet has a guaranteed spawn Moxsy farms at (-18, -266) around level 27, plus regular spawns on the nearest wildlife sanctuary island. You need a Breeding Farm (level 19), an Egg Incubator (level 10), and a Ranch (level 5) to run the loop.

A 21% coin flip on every single capture beats rerolling wild spawns for a week.
Once your Yakumo is live, every capture session doubles as a lottery ticket. Moxsy caught a  Helzephyr Lux with Musclehead, Ferocious, Runner, and Infinite Stamina, plus a wild
  Rayhound that came pre-loaded with Demon God and Serenity, and a
  Mammorest that walked out of the wild with Demon God already attached.

Guarantee 2: Surgery Table Transfers#
Unlocked at level 38, the surgery table converts near-perfect pals into perfect ones. Per Moxsy's testing it does two things:
- Transfer a passive from one pal onto another for 50,000 gold, replacing a chosen slot or filling an empty one.
- Flip a pal's gender with a Pal Reverser, bought for 7 bounty tokens from any PIDF officer at a small settlement. That solves the classic two-perfect-males problem without another dozen eggs.
This is the safety net for the breeding funnel: stop chasing the mythical flawless roll, breed until you are one passive short, then pay the gold. Selling surplus pals to black market traders funds it comfortably.

Guarantee 3: Arena Implants#
The last missing passive does not even need breeding. The PvE arena on the small island northeast of the starting area, at (626, 16) on Moxsy's map, pays out battle tickets per challenge: 1 for the entry tier, 6 at platinum, 25 at diamond.
Tickets buy implants: key items that let you slot a specific passive onto any pal at the surgery table. Serenity, Infinite Stamina, Runner, Noble, Healing Coach, Reload Master, and more run about 50 tickets each, and the shop even stocks a Pal Reverser for 35. Implants are permanent key items, so once you own the Serenity one you can finish every future three-passive keeper on the spot.

The Full Pipeline at a Glance#
- Level 19: build Ranch, Egg Incubator, Breeding Farm, and a berry plantation
- Catch Foxparks and Vaelet parents carrying Ferocious, Musclehead, or Serenity
- Breed a Yakumo and funnel passives until it carries your target stack
- Ride with Yakumo out on every capture for the 15 to 30% copy chance
- Level 38: add the surgery table for transfers and gender flips
- Farm arena tickets and buy the implants for your missing passives
None of these systems is fast on its own. Together they turn perfect pals from a lottery into a production line: breeding gives you the template, Yakumo mass-produces candidates, and surgery plus implants finish whatever RNG leaves incomplete. Set it up once and every catch for the rest of your save is playing with loaded dice.
If you are still setting up the base that feeds all those cakes, our early game cheat sheet covers the fastest route to a self-sustaining ranch economy.


Can be ridden. While fighting together, 15% increased chance of encountering pals with the same Passive Skill as this Pal. (Excludes certain Passive Skills)

 Leather×1–2
When activated, equips to the player and transforms into a flamethrower.
 Leather×1
 Flame Organ×1–2
While in party, Ground Pals drop 40% more items when defeated. (Does not stack) Sometimes drops various seeds when assigned to Ranch.


 Low Grade Medical Supplies×2
 Tomato Seeds×1

Can be ridden as a flying mount. While mounted, changes the player’s attack type to Electric and increases Attack by 5%.


 Electric Organ×1–3
 Medium Pal Soul×1
Can be ridden. Can perform a double jump while mounted. This Pal’s Movement Speed increases by 5% for each other Electric Pal in your party. (Excluding Rayhound)
Electric Organ×1–2
Can be ridden. While mounted, increases logging efficiency by 220% and mining efficiency by 500%.


 High Quality Pal Oil×5–10Leather×5–10


Comments
Loading discussion...