Why your base feels cramped and how to fix it#
Most Palworld bases run out of room long before they run out of ideas. You stack workstations, jam plantations into corners, and still watch your pals bump into each other and stall. The good news: almost every space problem in Palworld 1.0 has a fix that is baked right into how the game works, no mods required.
This guide walks through the space-saving tricks that turn a messy starter camp into a clean, efficient palace: stacking plantations with the pillow, abusing the base perimeter, building the largest circular base the game allows, walling out raids, and laying out pals so they never trip over each other. We pulled these techniques together after digging through Chaos Bear Gaming's excellent 1.0 base tour, then verified every step in-game.
Stack plantations with the pillow#
Plantations eat floor space faster than anything else in your base. The fix is the Japanese Floor Cushion, better known as the pillow, from the Japanese-style furniture set you unlock at level 55. Placing a pillow on top of a plantation lets you stack a second plantation directly above it, doubling your farm output on the same footprint.

Before you start, favorite the pieces you are about to spam. Open the build menu, favorite your wheat and  Red Berries plantations plus the pillow, and clear everything else out of the Favorites tab. Now you can flip between all three without hunting through categories.
The actual stack relies on alignment mode (hold the axis alignment button). Snap each plantation to a wall rather than to the plantation below it, and make sure the placement arrow points away from the wall and away from the outside of your base. Get that arrow backwards and your pals will path badly or get stuck outright. Build the plantation, drop a pillow roughly in the middle, then snap the next plantation to the wall on top of it. If a piece refuses to snap, your pillow sits too far back: break it down, nudge it forward, and try again.
Abuse the base perimeter#
Here is the trick that lets people build absurdly large bases without deterioration warnings, and it is not a glitch. Palworld decides whether a structure sits inside your base by asking a simple question: is at least half of it inside the boundary? If yes, the whole thing counts as inside.
That means you can push a foundation, wall, or station right up to the edge and keep going until just under half of it pokes past the blue line. Hover a foundation over the border and you will see it stay blue well past where you expect. Only when the majority crosses the line does it flip to yellow and warn you it is outside.

The biggest winner is the Pal Expedition Station. It is a monster of a structure, so shove it outward until it is about to turn yellow and let the front half sit inside. It still counts as a base structure, and you just reclaimed a huge chunk of interior floor. The breeding farm works too, since your pals never grab the eggs it produces. Be a little gentler with the ranch: pals can drop items just outside the line where your transport pal cannot reach them, so keep more of it inside.
Build the largest possible circular base#
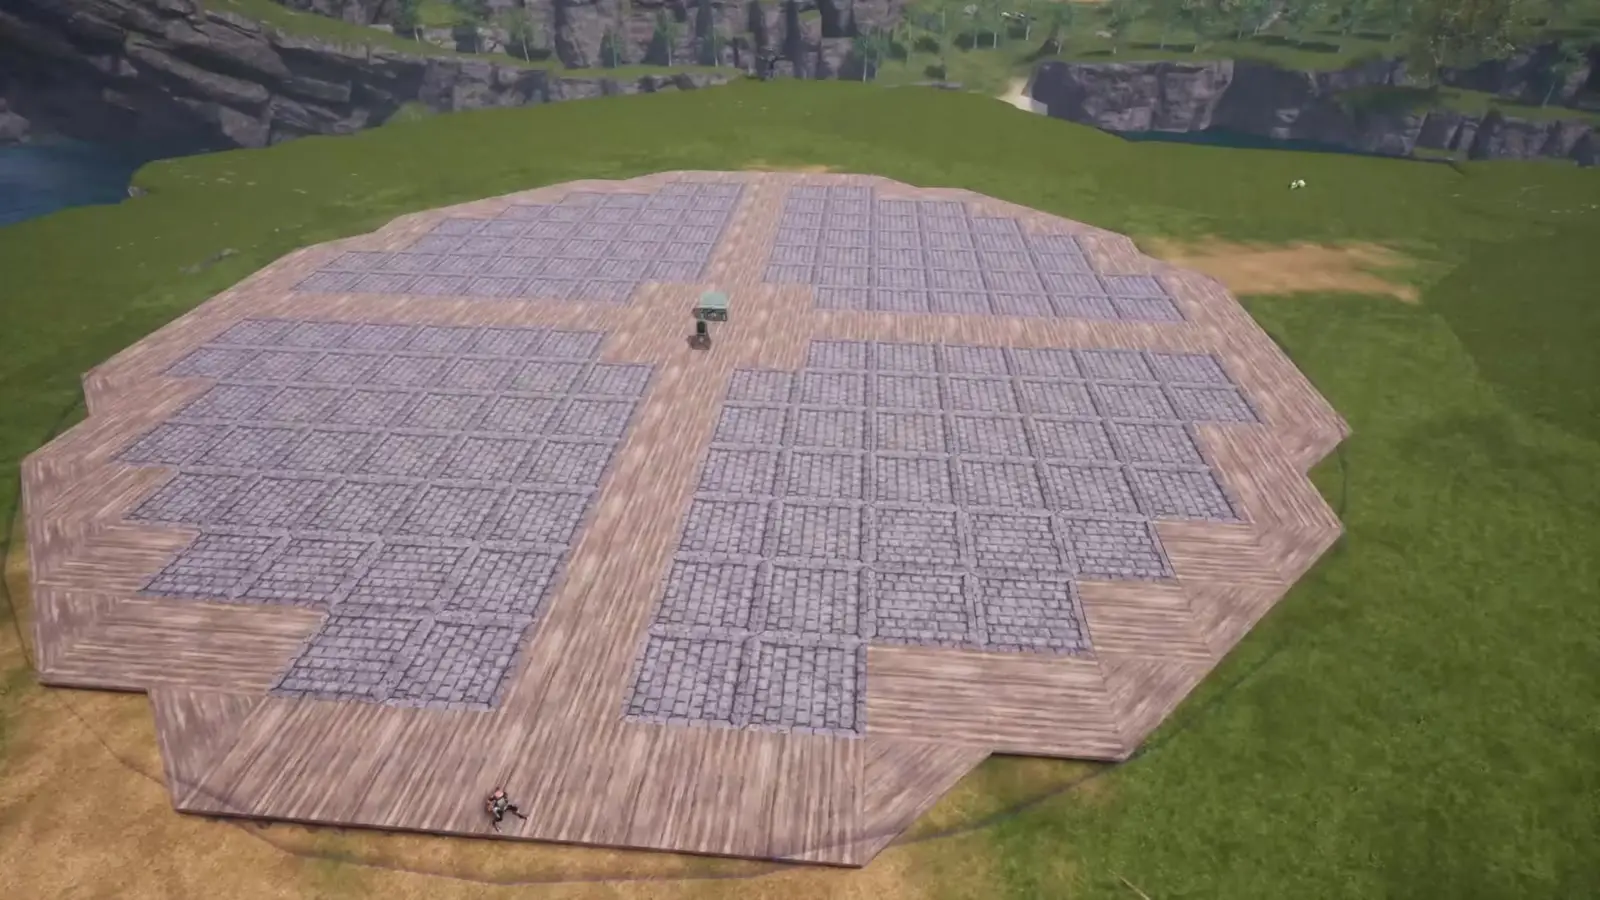
Once you understand the perimeter, you can tile an entire circular base right out to the edge. First, a critical setting.

Clear every natural resource node inside the perimeter first (small pebbles are fine, but break down stone and ore nodes). Then place one foundation as your center, snap a Pal Box to it with alignment mode just to preview the circle, and check the edges. Happy with the shape? Break the preview box, then build one ring of foundations around your center to make a 3x3 square and re-snap the Pal Box to the middle.
One thing to know: the side of the Pal Box with the sphere is the front, and pals spawn out of the back. Keep that back area clear. From there, build straight out to the circle edge on all four sides, then fill the diagonal gaps by alternating triangle and square foundations until the circle closes. Fill in every remaining quadrant with foundations and you have the largest base shape Palworld allows. Now you just need the right pals working it, and our best early game pals guide covers who to slot in first.
Wall the perimeter to stop raids#
Run a single wall all the way around the base bottom and something quietly changes: raids stop happening. If there is no gap for raiders to path through, the raid event simply never fires.
That is a blessing or a curse depending on how you play. Raids drop rewards and, like traveling merchants, they are events that visit your base. If you want that loot and those merchants, leave one section open or drop a Pal Passageway so visitors can still get in. If you would rather never be interrupted, seal that final wall and enjoy the quiet.
Hide the ugly blue border with glass#
Walled bases leave those blue boundary corners exposed, and they look rough. Glass is the cleanest fix. Use the replace feature to swap perimeter walls for glass, and the border mostly disappears behind them.

Here is the counterintuitive part: paint the glass black, hex code 000000. Instead of going dark, the glass turns crystal clear, giving you a nearly invisible wall that still hides the blue line. Run glass along any section where the border is an eyesore. One caveat: the very corners of your base sit just outside the boundary, so you cannot place decorative pillars there. For an efficiency build that never matters.
Raise and sink foundations#
Foundations are not locked to ground level. Grab one, look up or down with your character, and you can raise or lower it freely. Raise a foundation slightly and you can place walls along both its top and bottom edge, which is great for split-level looks and for leveling out uneven terrain without stairs.

Sinking a foundation into the ground is just as useful. Place one foundation at normal height, add a wall off it, then hold alignment mode and look up to snap the next foundation below ground level. Now you can stack open-air plantations in a tidy sunken pocket instead of hiding them in a building. Break down the surrounding walls afterward and you get a clean, compact farm your pals can reach from every side. This works best on flat ground and can misbehave near water.
Master alignment mode for storage and stairs#
Alignment mode does far more than snap plantations. A few high-value uses:
- Stairs: In 1.0, stacking a second flight used to clip into the ground. Hold alignment mode and stairs now drop cleanly into place.
- Perfect rows: Alignment mode lines up benches, stations, and storage against walls. To snap something into the middle of a wall, drop a pillar there first and snap off the pillar instead.
- Stackable storage: Most chests will not stack on their own, but the pillow acts as a spacer for almost anything. Break the pillow afterward and the chest floats in place.

For storage specifically, the tech tree rewards you early. The Wooden Tavern Cabinet set at level 5 gives you a stackable box and barrel long before the basic chest can stack. Late game, the Advanced Chest is the winner: snap four together on a single foundation, plus one below and one on top, for dense, tidy storage you barely have to manage.
Lay out pals for zero pathing headaches#
Efficiency is not just about space, it is about how little your pals have to walk. Group your automated tasks (mining nodes, plantations, electricity) as close together as possible so pals flow from one to the next instead of sprinting across the base. Keep manual tasks like the cooking pot and workbench farther out, since pals only visit them when you queue something.
Watch your work suitability and collision boxes here. Miners like  Cattiva will path around solid stations but walk straight through others. The large ore station and lumbering sites have no collision, so pals stroll right through them, which makes them safe to place in front of other stations. Solid stations block movement and cause pileups, so position those with care. If you want a full breakdown of which pals suit which job, our work suitability guides map every task to the right pal.
Transport is where tight layouts pay off most. Keep stations clustered and drop a food box and storage chest right in the middle, and a large transport pal barely has to move, grabbing ore and dropping it into storage almost in place. Big pals get a bad reputation for bases, but given enough room their reach and speed make them elite haulers.
Put it together#
Space in Palworld is not really limited, it is just poorly used by default. Stack your plantations, push bulky stations to the perimeter, tile out a full circular base, wall out raids, and cluster your pals tight, and even a single base can do the work of three. Full credit to Chaos Bear Gaming for the original 1.0 base tour that inspired this write-up.
If you are still scouting where to plant your flag, our guide to the best new base locations in Palworld 1.0 covers the where, and this guide covers the how. New to 1.0 in general? Start with the early game cheat sheet.



While in party, Cattiva helps carry supplies, increasing the player's max carrying capacity by 100. (Does not stack)


 Red Berries×1


Comments
Loading discussion...